Using the Dispatcher Paragon End User Interface
Overview
This chapter describes how to use the Dispatcher Paragon end user interface.
The Dispatcher Paragon end user interface is a web interface for end users, allowing them to manage their Dispatcher Paragon accounts. The Dispatcher Paragon end user interface is simple to use, responsive (adapts to different screen sizes (widths), looks good on both desktop PCs and mobile devices), and receives necessary data and configuration from other Dispatcher Paragon systems.
Logging In
Only users with an existing account in Dispatcher Paragon can log into the Dispatcher Paragon end user interface using their username and password.
Enter your username and password on the Dispatcher Paragon end user interface login screen. Your credentials are verified, and if the process is successful, you are logged into the application.
-
Go to the URL of the Dispatcher Paragon end user interface. The default URL is https://<server-ip-address>:9443/end-user/ui
-
Enter the credentials of your Dispatcher Paragon user account
-
Click Login.
Single Sign-On
If Single Sign-On is enabled in Dispatcher Paragon, users will be logged into the Dispatcher Paragon end user interface automatically. Only Windows Integrated Authentication is supported. Read more about how to use Single Sign-On here.
User Profile
The user profile is displayed in the upper right-hand corner of the Dispatcher Paragon end user interface after a successful login.
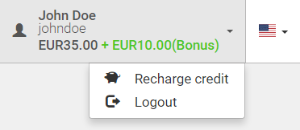
The user profile contains information about your name and surname, username, personal balance, virtual balance, a flag symbolizing the selected language, a link to recharge credit, and logout.
|
Element |
Description |
|
Name, surname, and username |
The full name and username of a logged user |
|
Personal balance and virtual balance |
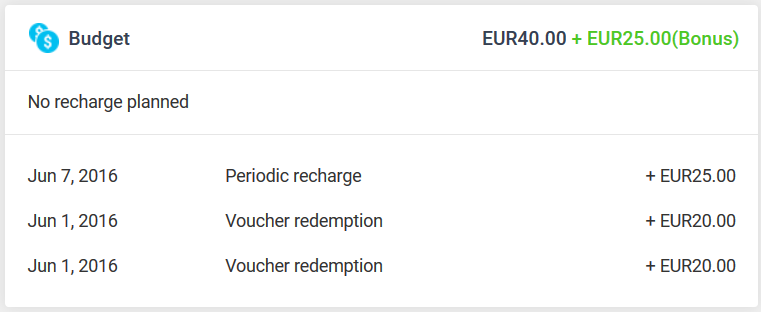
Personal balance and virtual balance are displayed only if Dispatcher Paragon Payment System is enabled and if the logged-in user has payment entitlement. Personal balance is displayed in gray. When a user recharges the credit on their account via the Dispatcher Paragon end user interface, the personal balance increases. Virtual balance is displayed in green as a "Bonus". Virtual balance represents a customer's bonus or free credit. It can be provided by a periodic recharge, a manual increase, or by setting an initial account balance. |
|
Flag symbolizing the selected language |
The language of the Dispatcher Paragon end user interface can be changed by clicking the flag in the upper right-hand corner and choosing the selected language. |
|
Recharge credit |
The Recharge credit link leads to the Recharge credit page. Note: this button is only visible when a logged-in user has Payment entitlement. |
|
Logout |
The Logout button logs the user out of the Dispatcher Paragon end user interface. The user is redirected to the login screen. |
Dashboard
The dashboard displays widgets, such as My recent jobs, My deposit, Budget, and Quotas.
|
Widget |
Description |
|
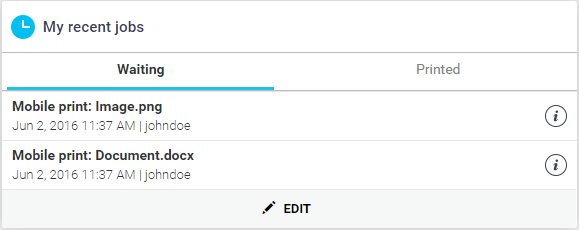
My recent jobs |
The My recent jobs widget displays a list of jobs ready to print (Waiting) and printed jobs (Printed). Jobs can be uploaded, for example, via the menu item Upload job in the Dispatcher Paragon end user interface. A user can display more information about a job by clicking the This widget is editable. By clicking the Edit button, the user can delete previously uploaded jobs. |
|
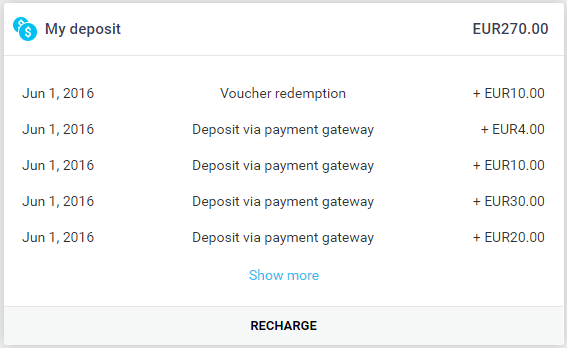
My deposit |
This widget is only visible to users with Payment entitlement and without a shared subject account. My deposit widget displays a list of transactions, such as deposit, withdrawal, voucher redemption, or transaction settlement. By clicking the Show more button, a user can view a whole history of their transactions. By clicking Recharge, a user can recharge credit. |
|
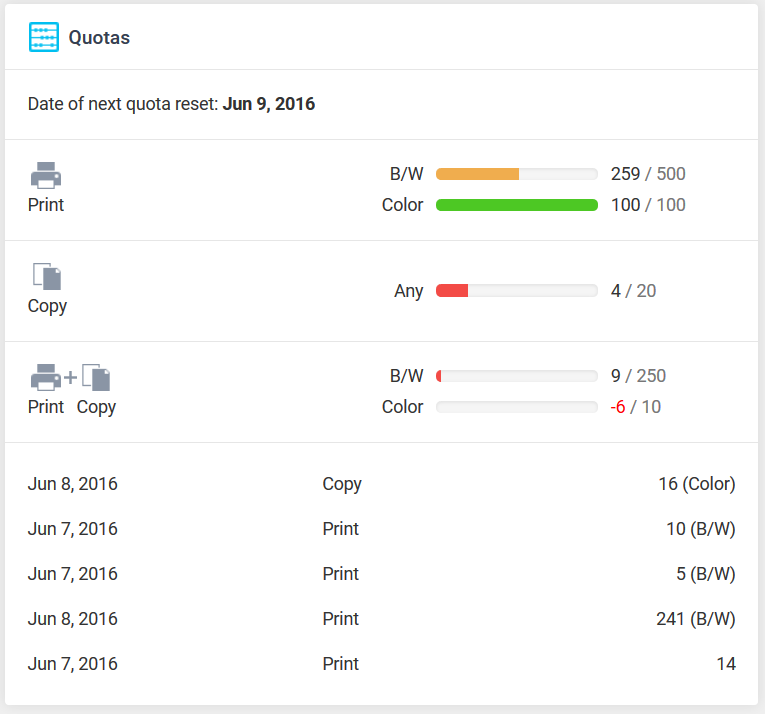
Quotas |
This widget is only visible to users with Quota entitlement. The Quotas widget displays information about a user's remaining quota and its reset date. The reset date is displayed by hovering the mouse over the remaining quota bar. If the reset dates for all quotas are the same, it is also shown below the title. The widget also displays a list of the last quota transactions. |
|
Budget |
This widget is only visible to users with Payment entitlement and a shared subject account. The Budget widget displays a list of recent transactions and the date of the next periodic recharge (if any). |
Upload Job
The menu item Upload job is visible only when Dispatcher Paragon Mobile Print is installed and enabled by your administrator.
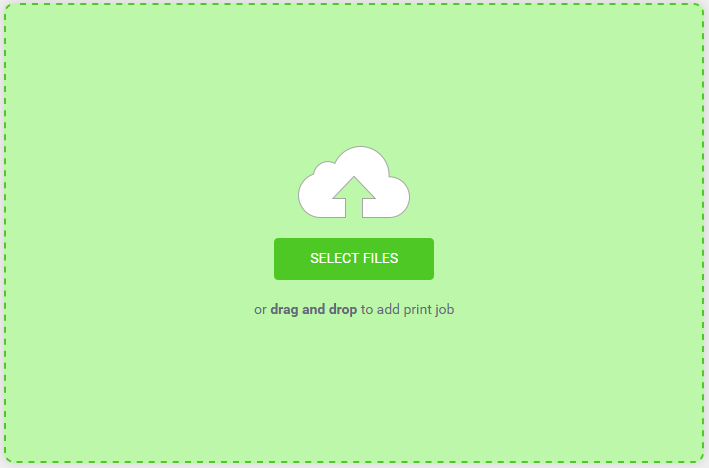
The menu item Upload job is developed for the quick and comfortable uploading of your print jobs.
-
Click the Select files button or drag and drop to add a print job.
-
Files from your computer can be selected in two ways:
-
Click Select files, select the required print jobs from your computer, and click open
-
Drag and drop the files to be printed
-
-
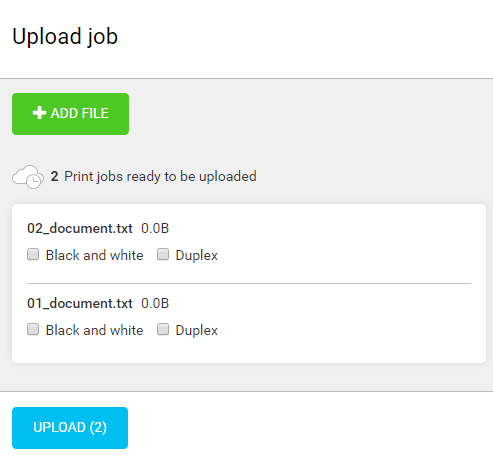
Print jobs are ready to be uploaded. You can leave them as they are or manage them by selecting the relevant checkbox:
-
Black and white (a job will be printed in black and white)
-
Duplex (allows printing on both sides of a sheet of paper)
-
-
To delete a job, just hover your mouse over the print job and click the revealed
 symbol.
 -
Click the Upload job button.
-
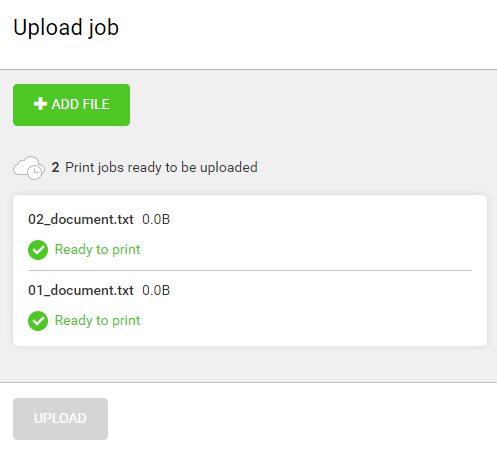
Jobs are successfully uploaded and ready for printing.
-
All jobs ready for printing are visible in the My recent jobs widget on the Dashboard.
When uploading a print job via the menu item Upload job in the Dispatcher Paragon end user interface, you have to wait a few seconds for the print job to be processed—this usually does not take longer than 10 seconds. The print job then appears in the Waiting section of this widget.
Payment
The menu item Payment is visible only when Dispatcher Paragon Payment System is installed and enabled by your administrator. Your account also needs to have Payment entitlement settings.
Account Details
The Account details tab contains data related to a user's payment account. The records are displayed in a tab and can be filtered by operation type, date from, date to, amount from, and amount to.
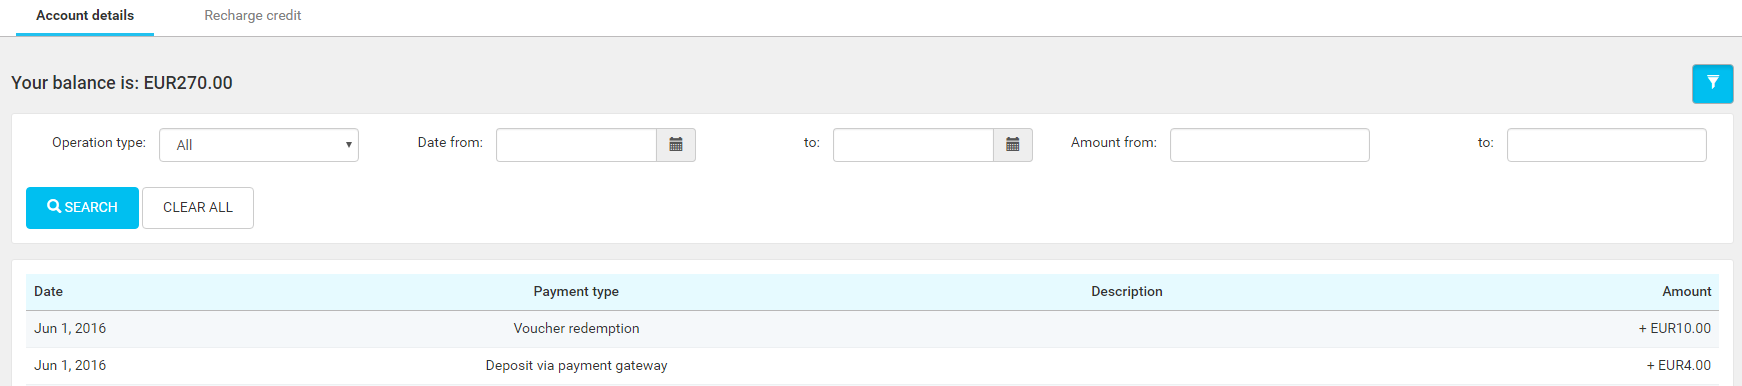
Transaction Filter
This filter allows you to filter transaction records. Filtered fields can be combined—the more fields you choose to filter, the more restricted the results are.
|
Element |
Description |
|
Operation type |
Restricts results to the selected operation type (for example, Cash desk deposit, Cash desk withdrawal, Voucher redemption, Deposit via Payment gateway, Balance decrease, etc.) |
|
Date from |
Restricts results to records after the selected date (the timestamp used is the start of the selected date—00:00) |
|
Date to |
Restricts results to records before the selected date (the timestamp used is the end of the selected date—23:59) |
|
Amount from |
Restricts the results to records with the amount >= given value |
|
Amount to |
Restricts the results to records with the amount <= given value |
|
Search button |
Submits the search query |
|
Clear all button |
Clears the form, but does not submit the search query |
List of Transactions
This list shows the history of transactions on your account. Transactions are ordered by date, the newest records are displayed at the top of the tab. Every transaction contains date, payment type, and amount—some transactions also have a description.
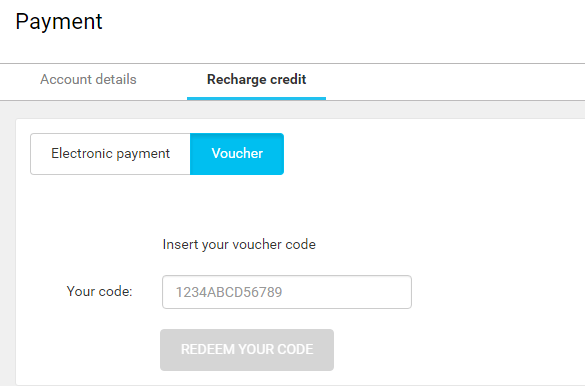
Recharge Credit
The Recharge credit tab contains the Voucher and Electronic payment tabs (if configured and allowed by your administrator).
Voucher
In this tab, you can redeem a voucher. Just enter your voucher code in the displayed field and click the Redeem your code button.
![]() If the voucher code is valid, your balance increases. You can view the transaction in the tab Account details.
If the voucher code is valid, your balance increases. You can view the transaction in the tab Account details.
![]() If the voucher is invalid (expired, already redeemed, etc.), the balance does not increase, and a validation message is displayed.
If the voucher is invalid (expired, already redeemed, etc.), the balance does not increase, and a validation message is displayed.
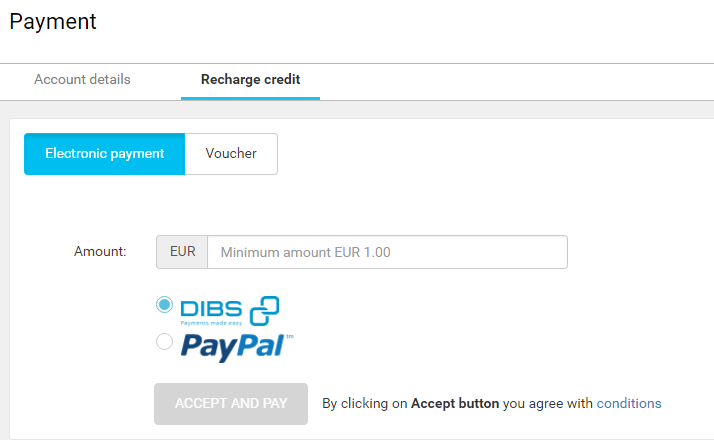
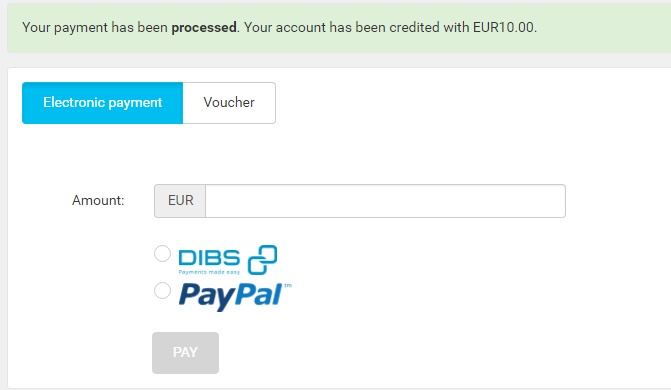
Electronic Payment
The Electronic payment tab is only visible when at least one Payment gateway for Dispatcher Paragon Payment System is configured, and Dispatcher Paragon Payment System is installed and enabled by your administrator
Via the Electronic payment tab, you can recharge your account via the selected payment gateway.
|
Element |
Description |
|
Accept and pay/ Pay |
The button redirects you to the selected payment gateway. The button is enabled only if an amount is filled in, it meets all validations, and a payment gateway has been selected. Accept and pay is displayed when Terms and conditions need to be accepted. Pay is displayed when Terms and conditions do not need to be accepted. |
|
Amount |
You have to enter the amount to recharge via the selected payment gateway into the Amount field.
|
|
List of payment gateways |
A list of all enabled payment gateways. At least one of them has to be selected to proceed. |
|
Terms and conditions |
If terms and conditions need to be accepted, a link to the terms and conditions is displayed next to the Accept and pay button. |
Depositing Money via DIBS
-
Go to the menu item Payment and click Recharge credit. The Electronic payment tab is displayed and you can see at least one payment gateway.
Depending on your country, you may be required to confirm the Terms and conditions. To display and get familiar with the terms and conditions, click the conditions link next to the Accept and pay button.
-
Enter the required Amount, choose the DIBS payment gateway, and click the Accept and pay button. If there are no terms and conditions to accept, click the Accept button.
-
You should be redirected to the DIBS portal page.

-
Fill in all the mandatory fields about your card and click the Validate payment button. You should be redirected to the DIBS's payment result page.

-
Click the Next button.
-
You will be redirected to the Dispatcher Paragon end user interface. A validation message about the recharge is displayed, and the balance on your account increases by the given amount.
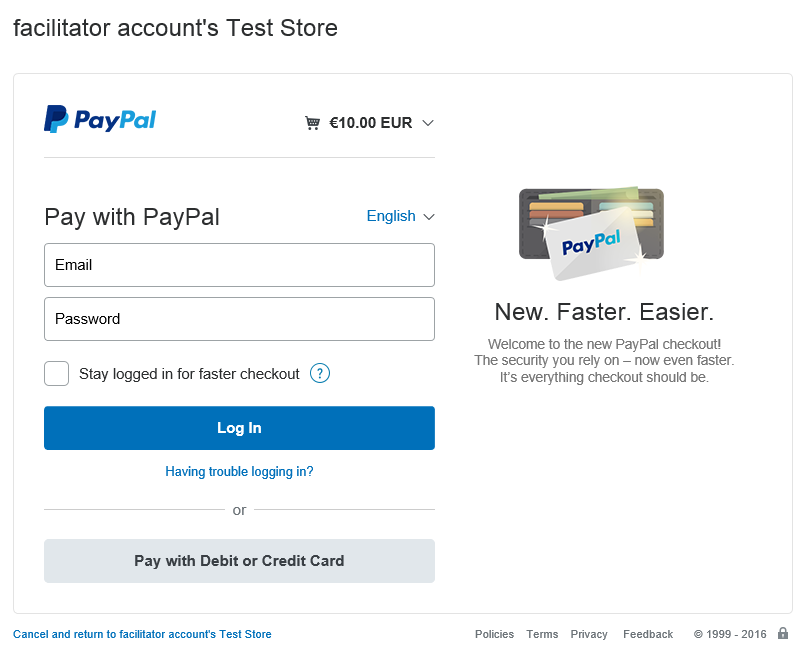
Deposit Money via PayPal
-
Go to the menu item Payment and click Recharge credit. The Electronic payment tab is displayed, and you can see at least one payment gateway.
Depending on your country, you may be required to confirm Terms and conditions. To display and get familiar with terms and conditions, click the conditions link next to the Accept and pay button.
-
Enter the required Amount, choose the PayPal payment gateway, and click the Accept and pay button. If there are no terms and conditions to accept, click the Accept button.
-
You should be redirected to the PayPal portal page.
-
Enter the email and password of your PayPal account and click Log In.
-
Check the information on the screen and click the Continue button.

-
You will be redirected to the Dispatcher Paragon end user interface. A validation message about the recharge is displayed and the balance on your account increases by the given amount.
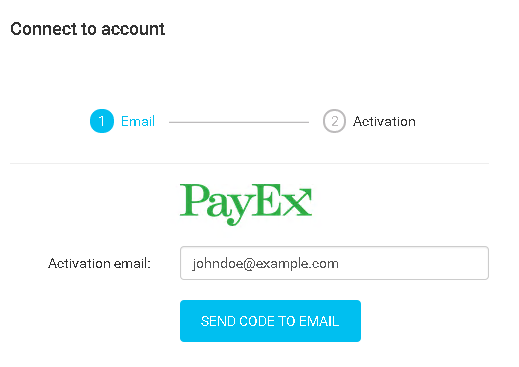
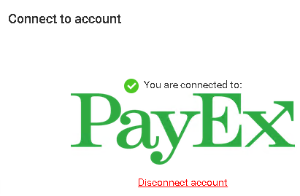
Account Connection
The Account connection menu is only visible when Dispatcher Paragon Payment System with an external payment system provider requires user authorization in order to access external account data (for example, PayEx).
The menu Account connection allows access to your external payment system provider's account. This is necessary for using Dispatcher Paragon Payment System features.
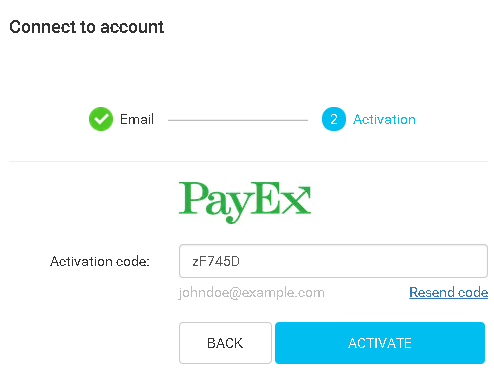
The activation process has two parts. Enter an activation email and then an activation code.
-
Enter the activation email used by your external payment system provider. An activation code will be sent to this email.
-
Enter the activation code and click Activate.
If you did not receive the activation code, use the Resend code link.
-
After authorization, you will see the result screen of PayEx activation. Optionally, you can use Disconnect account.
Related Documentation
Configuring Dispatcher Paragon end user interface (Installation and configuration of the Dispatcher Paragon end user interface for administrators)