Configuring Fuji Xerox XCP
Requirements
-
Device has to support the Dispatcher Paragon Embedded Terminal, supported devices are listed on the Partner Portal in the HCL list.
-
Device has to support eXtensible Customizing Platform (XCP) versions 1.2+ (for YSoft Terminal Aplication - 2nd Gen. is required version 1.4+).
-
External Access Kit (Web Browser, EBW v4) and Customize Extension Kit (XCP, Plug-in) are installed (Should be done by Fuji Xerox service engineer)
-
Proper NVM is set in service mode (Should be done by Fuji Xerox service engineer)
-
If you are planning on using Elatec TWN4 reader, make sure the reader has Keyboard standard firmware.
General Notes
-
During MFD configuration, MFD sometimes requires reboot. When prompted for reboot, follow the instruction displayed either on CentreWare Internet Service or on MFD operation panel.
-
Make sure that External Access Kit and Customize Extension Kit are installed and configured at the MFD.
MFD Configuration
Configurations via operational panel
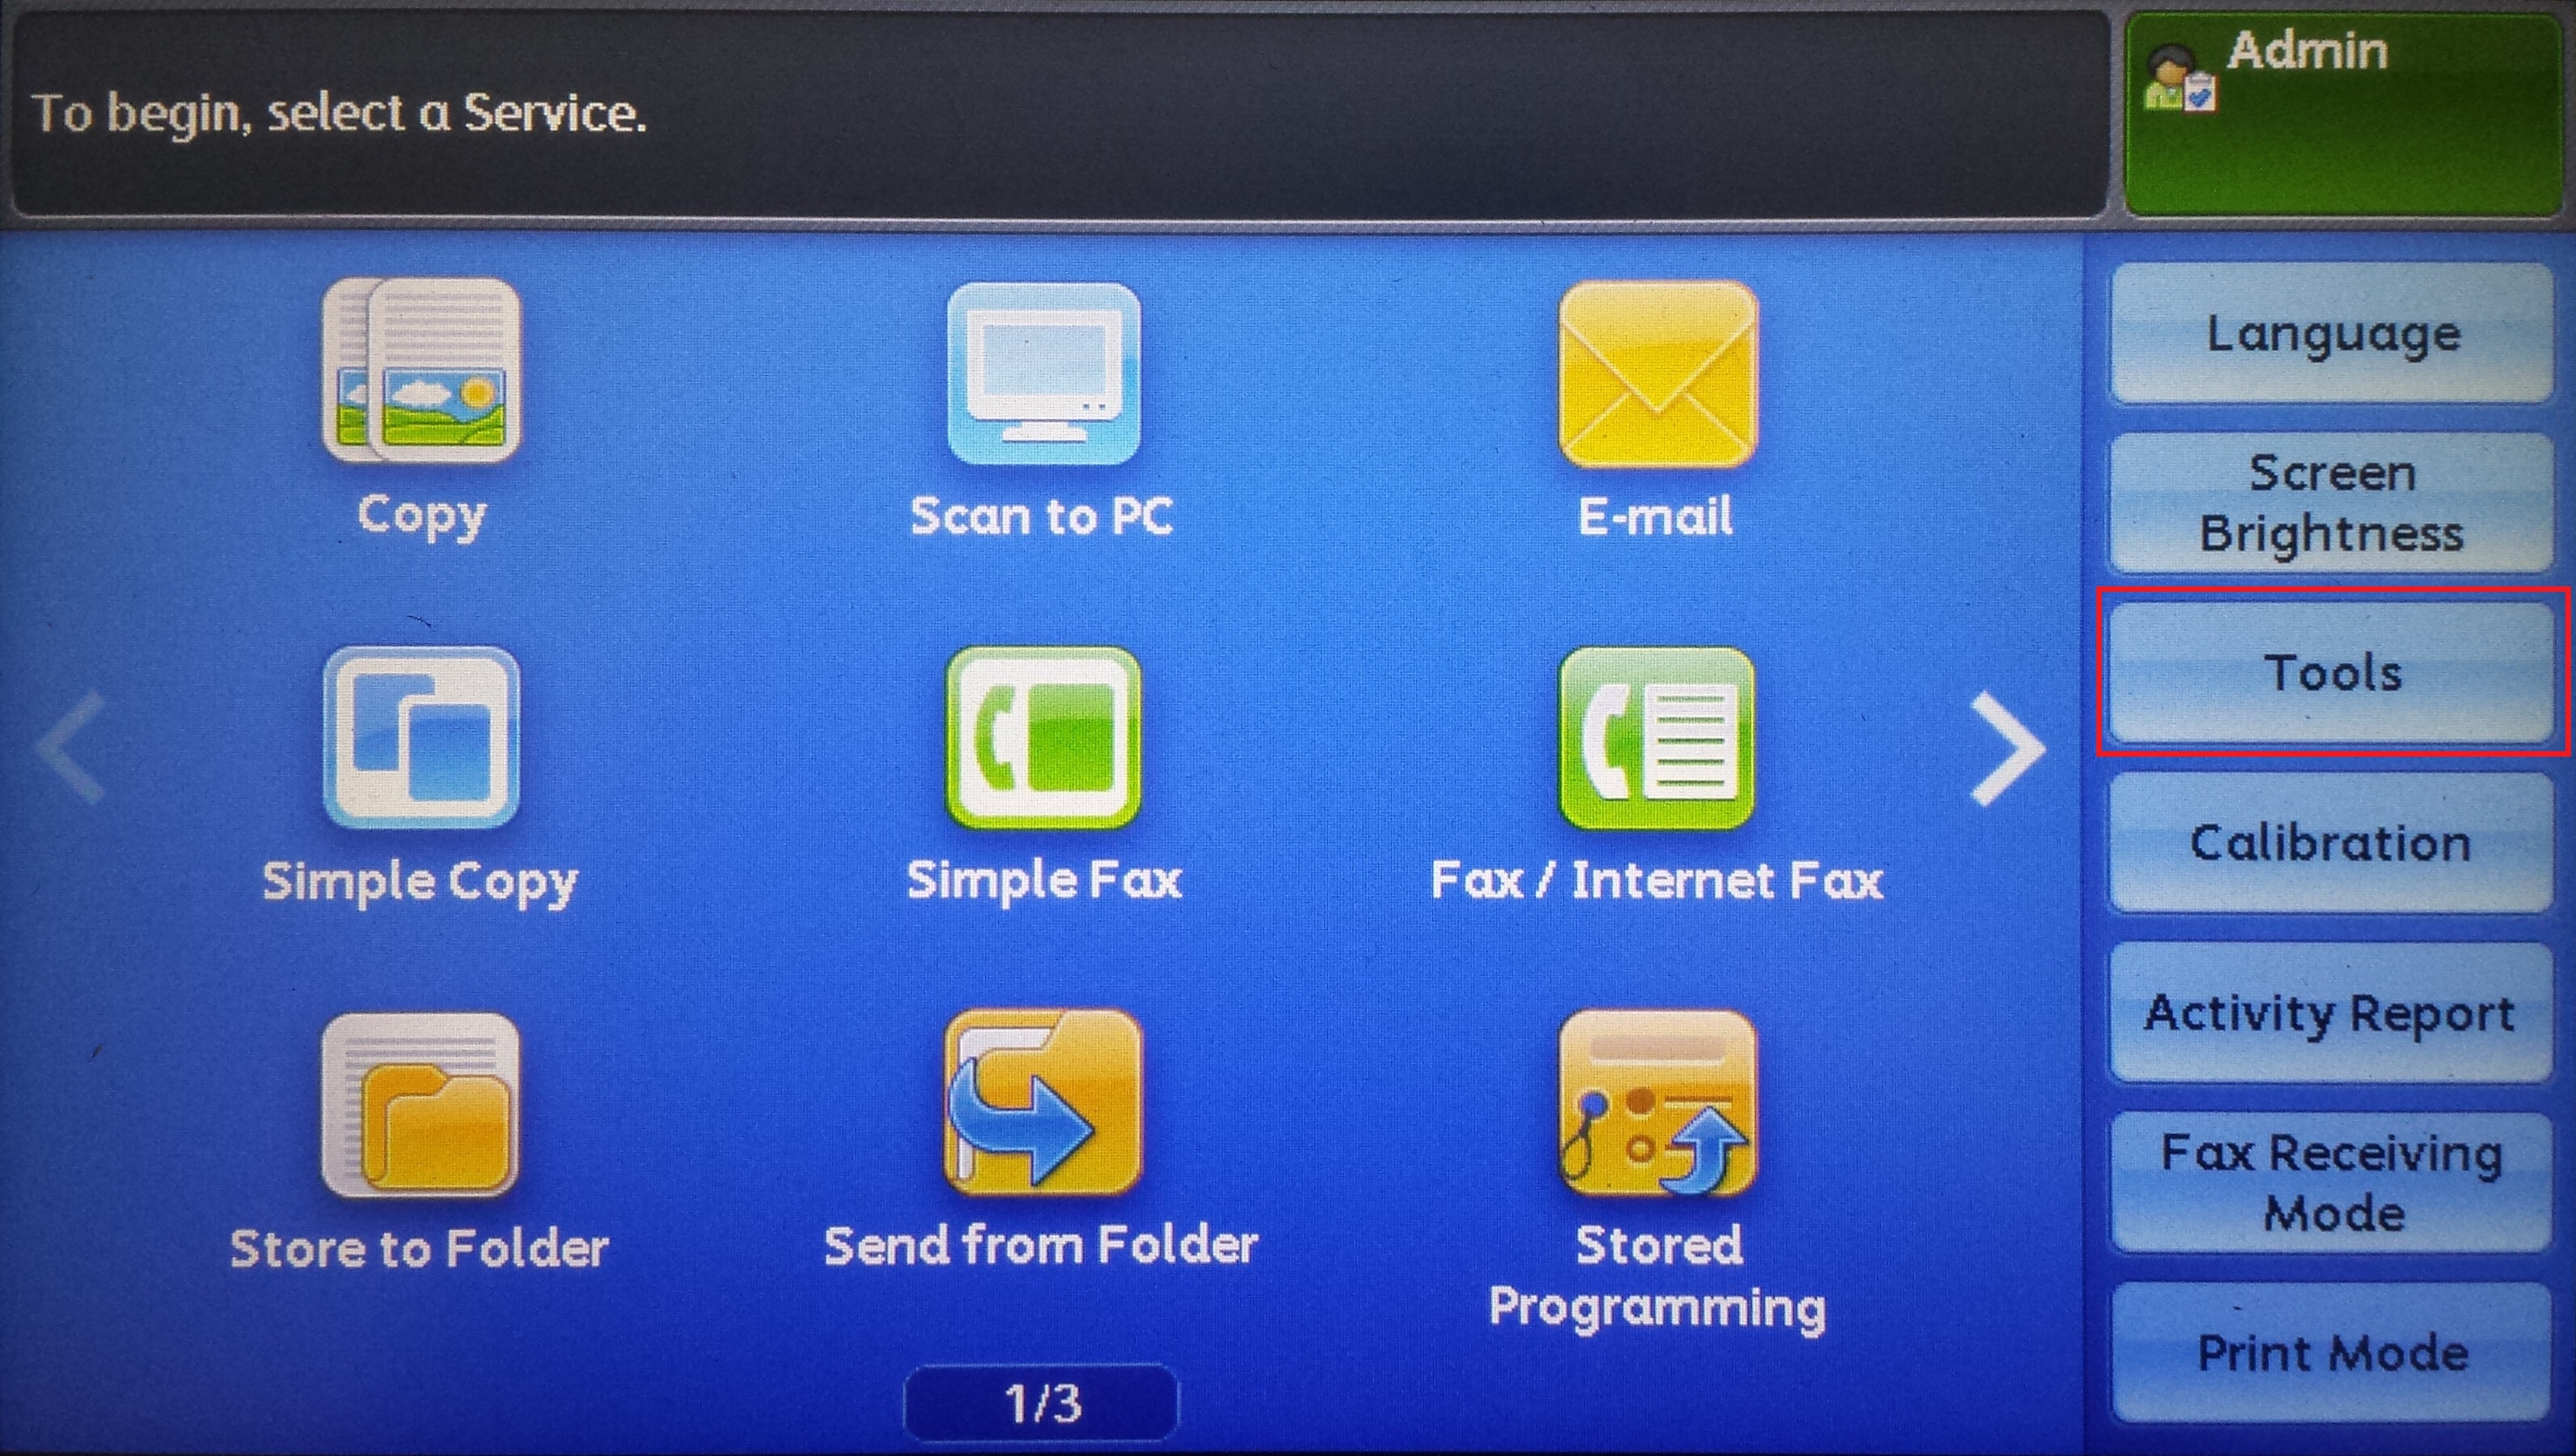
1 Login to MFD as a system administrator and go to Tools.
Default credential is 11111.
2 Optional: Clear job history by deleting all data
Go to System Settings > Common Service Settings > Maintenance and tap Delete all data
3 Configure static IPv4 address
System Settings > Connectivity & Network Setup > Protocol Settings
4 Configure time zone, date and time according to the server running SafeQ
System Settings > Common Service Settings > Machine Clock/Timers
-
Time Zone
-
Date
-
Time
Set these options in the aforementioned order, because the Time Zone setting has effect on the Time setting.
5 Optional: Configure NTP settings
System Settings > Common Service Settings > Machine Clock/Timers
-
NTP time synchronization: On
-
NTP server address
6 Minimize waiting time to release print job
System Settings > Common Service Settings > Machine Clock/Timers
-
Auto Print: 1 Seconds
7 Dispatcher Paragon Terminal Application - 1st Gen:
Place Web Application Server 1 on home screen
System Settings > Common Service Settings > Screen/Button Settings > Service Home
Dispatcher Paragon Terminal Application - 2nd Gen:
Place Web Application Server 1 (Print)
Place Web Application Server 2 (Scan)
Place Web Application Server 3 (Billing Codes)
System Settings > Common Service Settings > Screen/Button Settings > Service Home
8 Optional: Enable auto completion of email address in native scanning application
System Settings > E-mail/Internet Fax Service Settings > E-Mail Control
-
Add Me to "To" Field
-
Add Me to "Cc" Field
9 Configure access control
Authentication/Security Settings > Authentication > Access Control...
-
Device Access to Unlocked
-
Service Access > Copy to Locked (Show Icon)
-
Feature Access > Color Copying to Locked
After uninstallation of the Embedded Terminal from the MFD, these settings need to be set to Unlocked in order to allow access to the MFD's functions again.
Configurations via CentreWare Internet Service
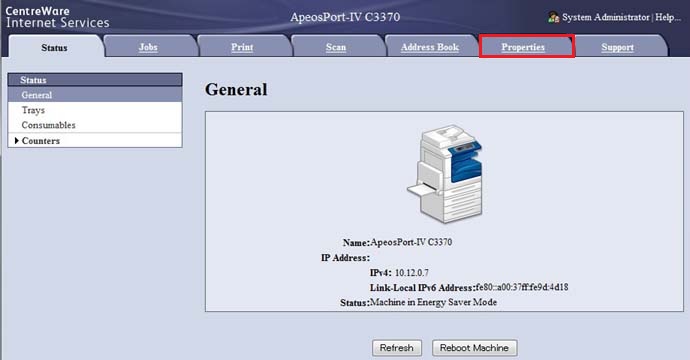
1 Access to MFD at http://MFP_IP_Address using Web Browser.
Following screen will be displayed. Then click Properties tab. Authentication dialog pops up. Type in admin credentials. (Default credential is username: 11111, password: x-admin)
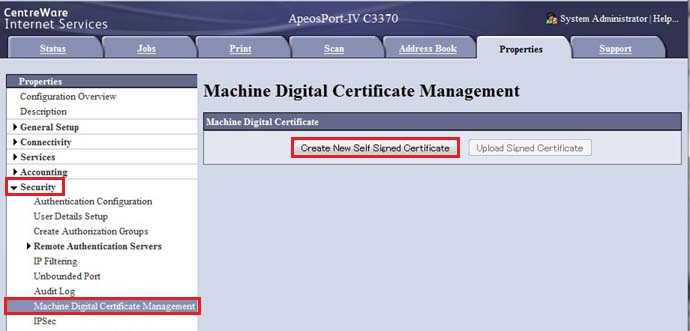
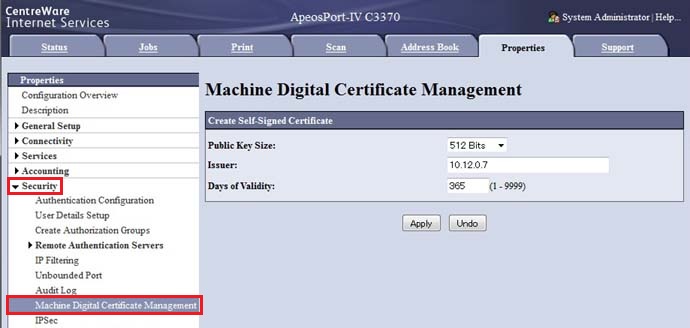
2 Generate Machine Digital Certificate
Select Machine Digital Certificate Management > Create New Self signed Certificate
Public Key Size: leave it as default.
Issuer: MFD address (entered by default)
Days of Validity:
Click Apply
3 Enable SSL/TLS
Go to Security > SSL/TLS settings
Enable HTTP - SSL/TSL Communication
Click Apply
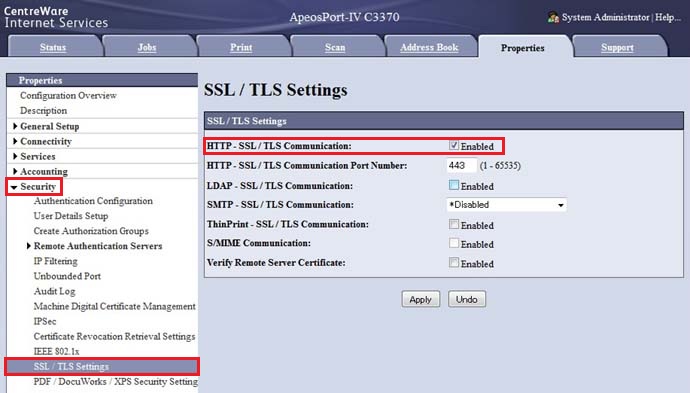
Make sure to keep Verify Remote Server Certificate disabled. Otherwise, users would get an error message when opening Dispatcher Paragon application on the MFD panel due to an untrusted certificate.
4 Verify Secure HTTP(SSL) is enabled (by default, it is enabled)
Go to Connectivity > Protocols
Check that Secure HTTP(SSL) is enabled. If it is not checked, check it and click Apply.

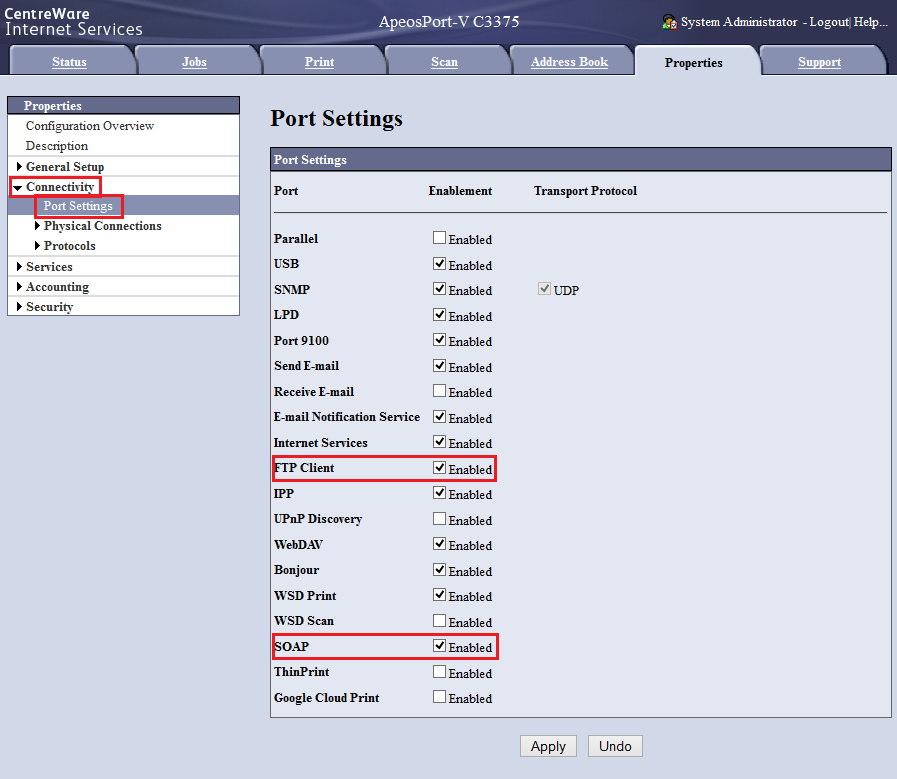
5 Verify both SOAP and FTP Client are enabled
Go to Connectivity > Port Settings
Check that both SOAP and FTP Client are enabled. If not, check them.
The port 9100 needs to be disabled only for improving security. You need to enable this port when performing a firmware upgrade.
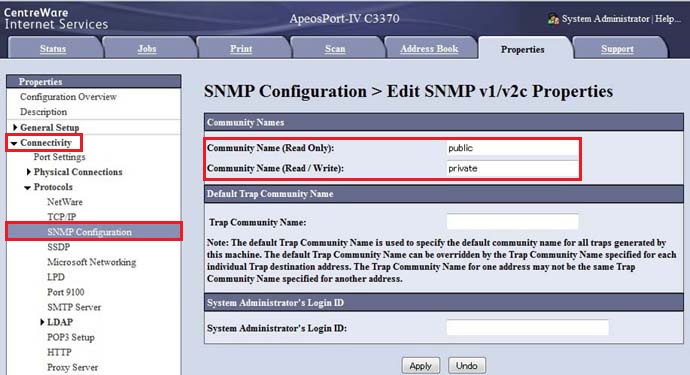
6 Enable SNMP and define SNMP Read/Write community
Go to Connectivity > SNMP configuration
Enable SNMP Port Status.
Enable SNMP SNMP v1/v2c Protocols.
Click Edit SNMP v1/v2c properties.

Define Community Name (Read Only) as public
Define Community Name (Read/Write Only) as private
Click Apply
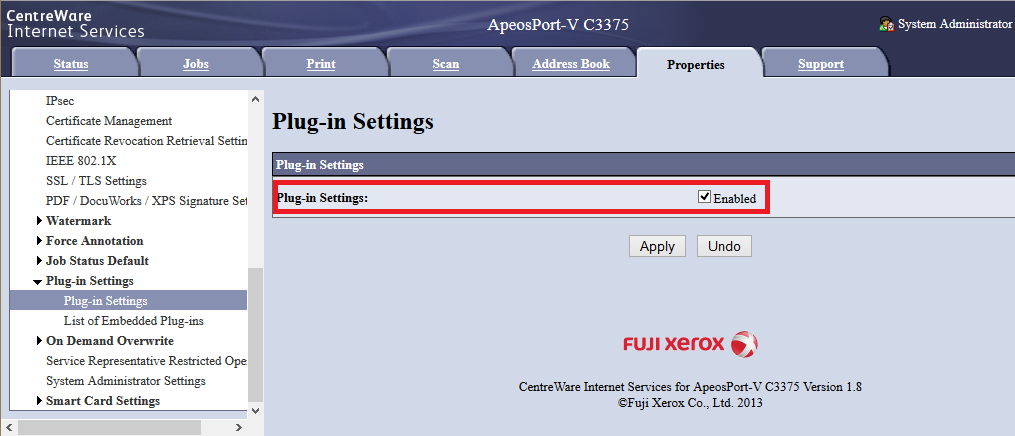
7 Enable XCP plug-in setting
Go to Security > Plug-in Settings > Plug-in Settings and enable Plug-in Settings.
Click Apply and optionally reboot the machine.
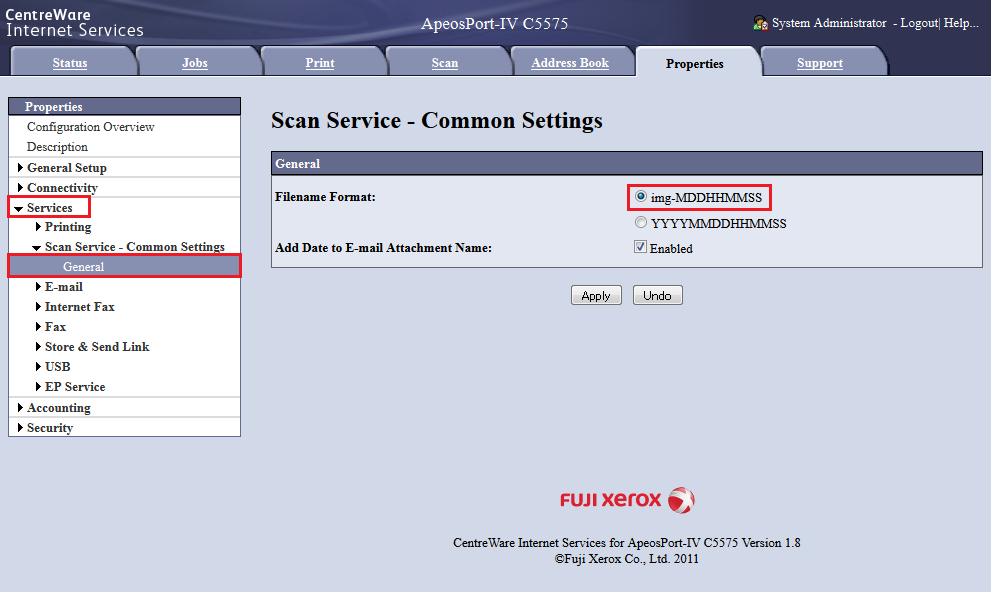
8 Change Filename Format
In order to use scan workflow feature, perform following steps:
Go to Services > Scan Services > General
Change Filename Format option to img-MDDHHMMSS
Click Apply
9 Disable Track Print Jobs with Accounting/Billing device
In order to use direct print feature without authentication to device before print perform following steps:
Go to Accounting > Accessory settings
Uncheck/disable option Track Print Jobs with Accounting/Billing device
Click Apply
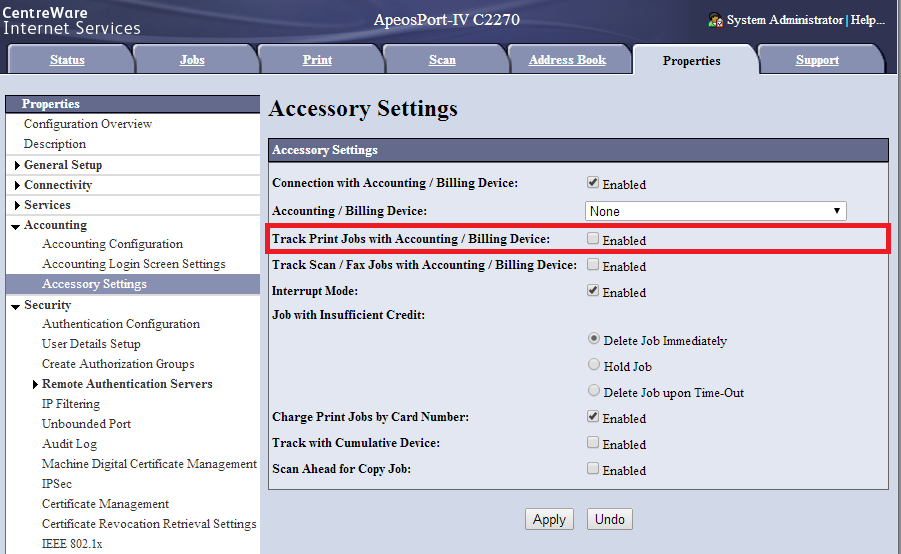
Reboot machine to apply changes.
10 Enable Card Reader support
If you are planning on using authentication with card, set the following property to Enabled, otherwise set it to Disabled.
Login as administrator on MFD.
Go to Setup > Authentication/Security Settings > Authentication > User Details Setup...

Click on Use of Smart Card.
Set Use of Smart Card to Enabled, Print to Card Validation Off, Fax/Scan to Card Validation On.
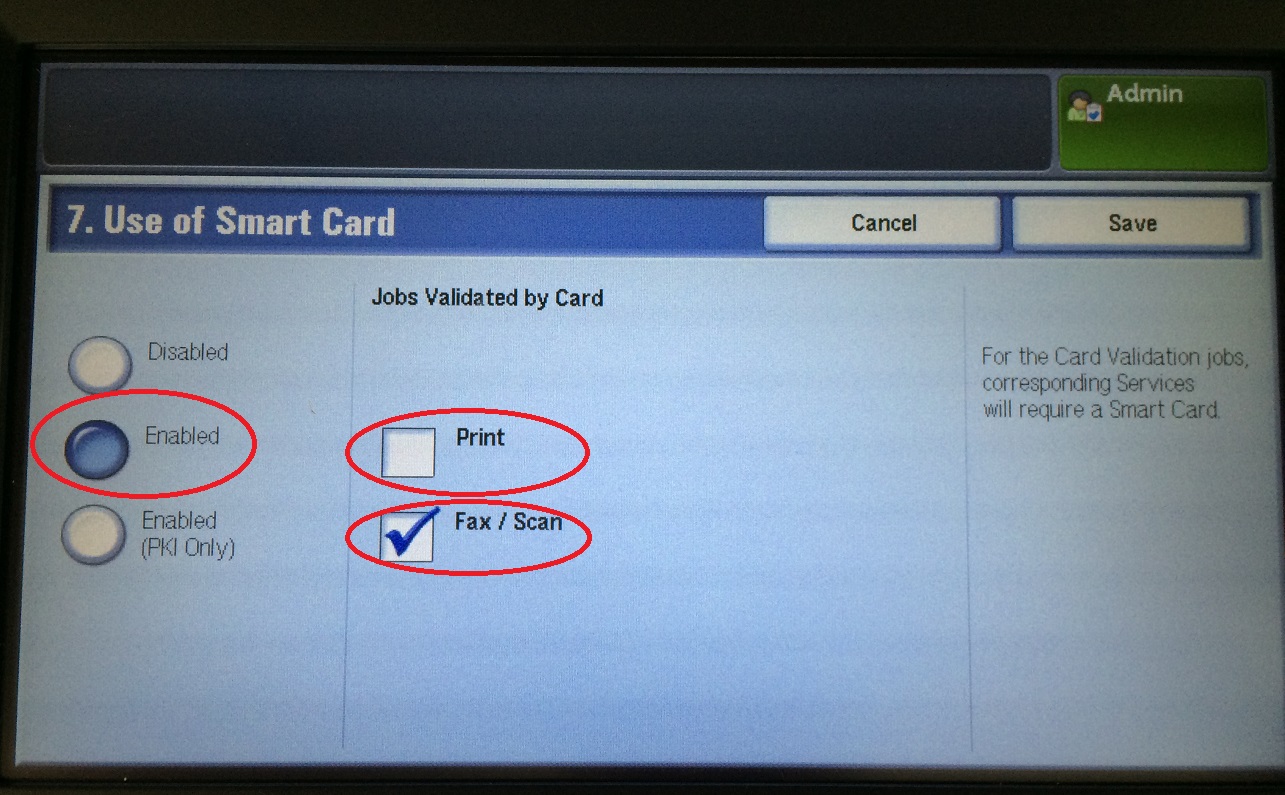
Click on Save.
Do not enable Use of Smart Card when Card Reader is not connected or you will not be using authentication with card.