Edit connector
A connector defines connection configuration required by scan workflows to deliver documents to external systems. Each type of external system has its specific configuration properties.
Also it is possible to define advance configuration properties to your workflow, independently of the selected type of connector.
It is possible to create several connectors of the same type; for example, you may create two file system type connectors, each of which accesses a different shared folder and authenticates using different credentials. A single connector may be used as scanned document destination in multiple workflows.
Let's have a look at how to configure connectors to different types of external systems.
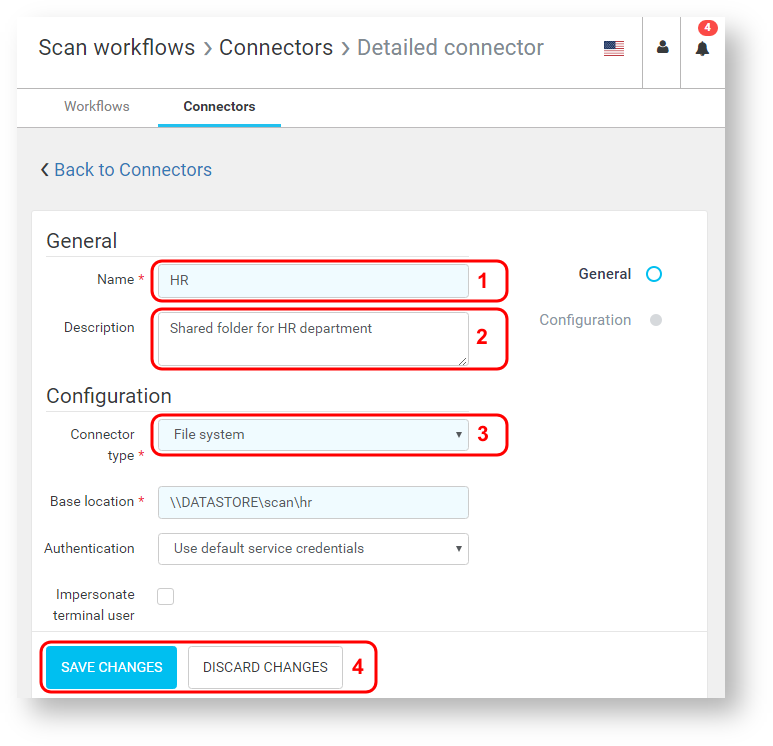
General
First, you configure general properties that are common to all connector types.
-
Name - Name of the connector. It is displayed in the connector list. Together with the connector type icon, it helps you identify the connector.
-
Description (optional) - Additional information about the connector. Usually detailed information to help you and other Dispatcher Paragon administrators understand the purpose of the connector.
-
Connector type - Connector type determines the type of the external system to which you would like to connect. Selecting a connector type displays additional connector configuration options.
-
Save changes, Discard changes - Save or discard all changes you made to the connector and return to the connector list.
Configuration
Next, you configure properties specific to each connector type.
File system
You use the File system type connector to access either local file system or network shared folder.
-
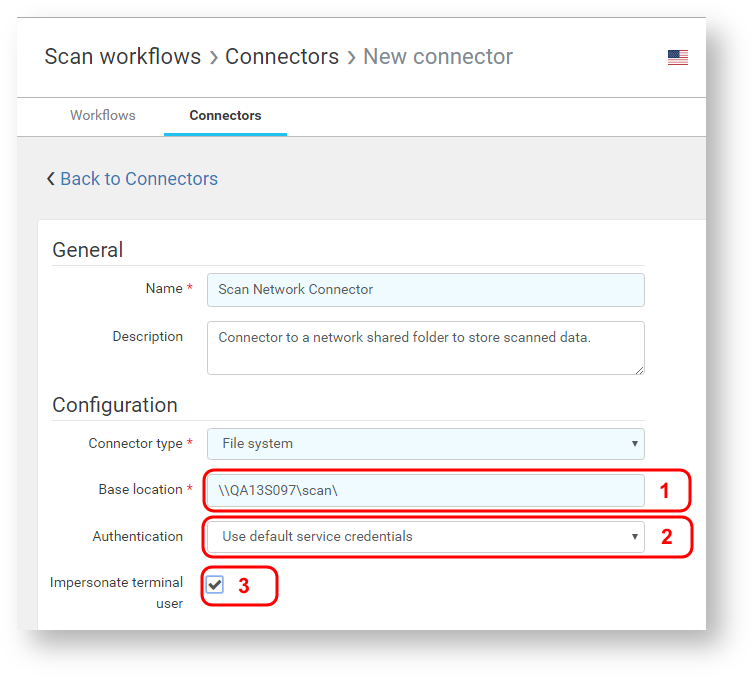
Base location
Defines a starting path for all workflows using this connector. Can be:
-
path to a local filesystem on server running Dispatcher Paragon Workflow Processing System, e.g. 'C:\scans\'
-
UNC path to a network shared folder, e.g. '\\dispatcher_paragon_server_hostname\scans\'
Base path can contain capture variables, e.g. '%userHome%' variable.
-
-
Authentication
Determines which credentials Dispatcher Paragon will use to access the folder. You may choose from the below options:
-
Use default service credentials - the same account under which Dispatcher Paragon Workflow Processing System service is running will be used (most suitable for a local filesystem path)
-
Use custom service account - allows you to manually set account credentials (most suitable for a shared network folder)

-
Username - account name in format 'domain\username', e.g. 'paragon.local\scanservice'. If domain is omitted, local host is used (.\username).
-
Password - account password
-
-
-
Impersonate terminal user
When this option is enabled, Dispatcher Paragon will access the file system location as it would be access by the user logged in at Dispatcher Paragon terminal. Dispatcher Paragon will verify whether the impersonated user has enough permission to write to the folder or to browse it and the file/directory owner will be changed appropriately. Enabling terminal user impersonation is helpful when you want to restrict access to certain folders in a shared folder and to keep track who created files.
In order to allow Dispatcher Paragon to impersonate terminal user, additional configuration is needed:
-
usernames in Dispatcher Paragon must be in UPN format (username@domain), e.g. user@paragon.local - this username will be then seen as the file owner
-
WPS service must have read and write access to the shared folder and all its content
-
use custom service account which has required permissions
-
-
WPS service must have Restore files and directories privilege on the machine which hosts the shared folder in order to change file/directory owners. You can accomplish this in several ways:
-
Workflow Processing System runs under Local System account by default, which means you can add all computers running the service in Local Security Policy console (secpol.msc) to 'Restore files and directories' policy located in Local Policies, User Rights Assignment folder
-
or you can add all computers which hosts Workflow Processing System into Backup Operators group (which has required privileges in default) in your domain
-
or you can change the account under which Workflow Processing System services are running in Services console to the one which has required permissions
-
-
For proper delivery of scans into distributed filesystem (DFS), please make sure that "Network access: Do not allow storage of passwords and credentials for network authentication“ global policy is set to "Disabled" or not set at all on every server running "WPS" service.
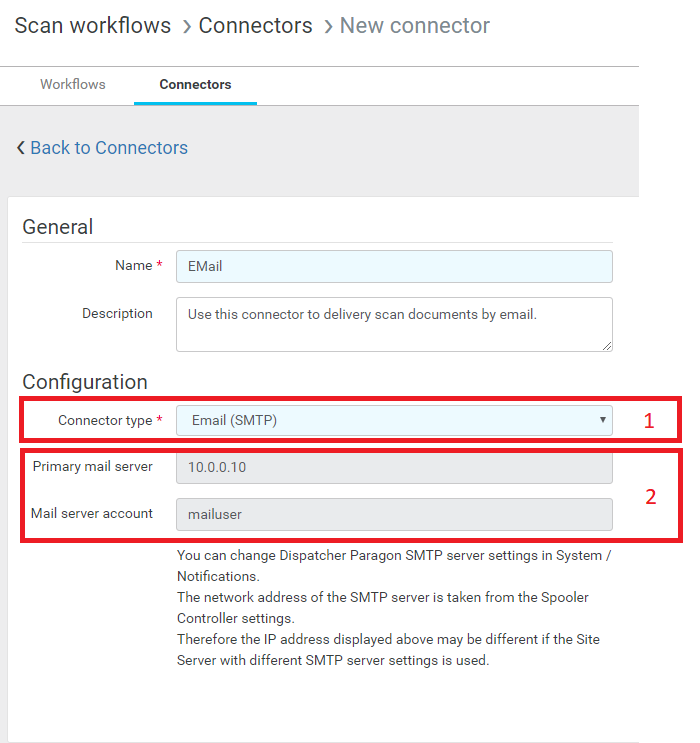
Email (SMTP)
You use the Email (SMTP) type connector to deliver scanned files over email using an SMTP server. There are no editable configuration options for this connector, you are only displayed Dispatcher Paragon global mail server configuration.Please ensure you configure your SMTP mail server in System/Configuration. In case mail server settings are not configured correctly, it is still possible to create an Email (SMTP) connector; however, workflows that use the connector will fail delivering scanned files. In such case, the Workflow Processing System logs an error in the wps.log file.
-
Connector type - Select Email (SMTP) from connector type list.
-
Primary mail server - SMTP server host address set in System > Configuration page or Dashboard > Welcome to Dispatcher Paragon widget.
Mail server account - SMTP username set on System > Configuration page or Dashboard > Welcome to Dispatcher Paragon widget.
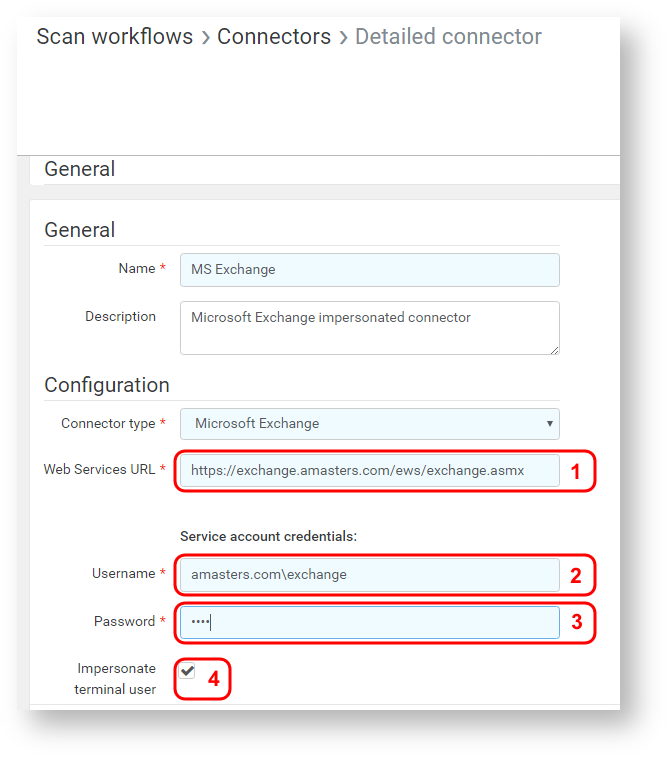
Microsoft Exchange
You use the Microsoft Exchange type connector is to deliver scanned files over e-mail using a Microsoft Exchange Server. This connector functions similarly to Email (SMTP) type connector; however, Microsoft Exchange enables additional capabilities including terminal user impersonation.
-
Web Services URL - Microsoft Exchange 2010 or Microsoft Exchange 2013 Web Services URL (usually https://<mail.server>/EWS/Exchange.asmx).
-
Username - Domain and username of Microsoft Exchange account used for authentication. If domain is omitted, local host is used (.\username).
-
Password - Password of Microsoft Exchange account used for authentication.
-
Impersonate terminal user (optional) - When terminal user impersonation is enabled, exchange connector acts as the mailbox owner. In such case, email address of the Dispatcher Paragon user logged in on the terminal must also exist in MS Exchange (you can configure a user's email address in the Users tab of the Dispatcher Paragon management interface). Emails sent using a Microsoft Exchange type connector with user impersonation enabled will be stored in user's Sent Items folder. Service account should be in ApplicationImpersonation MS Exchange role when using terminal user impersonation.
When terminal user impersonation is disabled, all emails sent using the connector will be sent using the service account mailbox. Email sender will be the specified service account and sent emails will be in the service account's Sent Items folder in Microsoft Exchange. Please refer to Edit workflow - MS Exchange if you want to use Send on behalf or Send as functionality.
Advanced Settings
Enable advanced settings by switching to the "Advanced" page view. Advanced settings let you configure the following additional connector options:
-
Failure behavior
-
Restrictions
-
Notifications
Failure behavior
Use connector failure behavior to configure next steps in case scan processing or delivery fails. In Failure behavior you can specify a backup directory with its authentication type, number of retry attempts and delay between these attempts.
-
Enable fallback directory - Enable or disable saving files to a fallback directory in case of scan failure.
By default, this option is enabled and the default fallback directory path is set to: '%safeqHome%\FailedScans\%userUsername%\%scanDate%'
-
Fallback directory - Defines the path where scanned document is going to be stored in case the workflow fails during scan processing or delivery. The value of the field can be:
-
path to a local filesystem on server running Dispatcher Paragon Workflow Processing System, e.g. 'C:\scans\'
-
UNC path to a network shared folder, e.g. '\\dispatcher_paragon_server_hostname\scans\'
-
-
The value can contain capture variables, e.g. '%userHome%' variable.
-
Authentication - Determines which credentials Dispatcher Paragon will use to access the backup directory. You may choose from the below options:
-
Use default service credentials - the same account under which Dispatcher Paragon Workflow Processing System service is running will be used (most suitable for a local filesystem path)
-
Use custom service account - allows you to manually set account credentials (most suitable for a shared network folder)
-
-
Username - Account name in format 'domain\username', e.g. 'paragon.local\scanservice'. If domain is omitted, local host is used (.\username).
-
Password - Account password.
-
Number of retry attempts - In case scan delivery fails, the number of times the Dispatcher Paragon Workflow Processing System will retry delivery of a scan before a scan job fails.
-
Delay between retry attempts - Delay before each delivery retry attempt.
Restrictions
Use connector restrictions to apply limits to scan jobs - You can set up a maximum number of scanned files per scan job, maximum size of the scanned job and define an alternative location for the scanned document in case this limitations are reached, so the scanned document is not lost.
-
Enable delivery restrictions - Enable or disable restrictions functionality. If it's not checked, then the form is not displayed.
-
Maximum number of scanned files per scan job - Set a limit for scanned files per job.
-
Maximum scan job size - Set a limit for the size of the scanned document.
-
Directory for scan jobs that exceed limits - Defines the path where scan is going to be stored in case any of the limitations is reached while scanning the document. Can be:
-
path to a local filesystem on server running Dispatcher Paragon Workflow Processing System, e.g. 'C:\scans\'
-
UNC path to a network shared folder, e.g. '\\dispatcher_paragon_server_hostname\scans\'
It can contain capture variables, e.g. '%userHome%' variable.
-
-
Authentication - Determines which credentials Dispatcher Paragon will use to access the backup directory. You may choose from the below options:
-
Use default service credentials - the same account under which Dispatcher Paragon Workflow Processing System service is running will be used (most suitable for a local filesystem path)
-
Use custom service account - allows you to manually set account credentials (most suitable for a shared network folder)
-
-
Username - Account name in format 'domain\username', e.g. 'paragon.local\scanservice'. If domain is omitted, local host is used (.\username).
-
Password - Account password.
Notifications
Use connector notifications to enable email notifications. It is possible to configure notifications whether the scan delivery succeeds, scan delivery fails, or when restrictions where reached. For each of the notifications it is possible to set up recipient, subject and body of the email.
-
Delivery failure notifications - Enable or disable notifications in case scan delivery fails. If disabled, then the form is not displayed.
-
Recipients - Recipients of the email notification.
-
Subject - Subject of the email notification.
-
Body - Body of the email notification. You may use html tags to format the body.
-
Delivery success notifications - Enable or disable notifications in case scan delivery succeed. If it is not checked, then the form is not displayed (same fields as in delivery failure notifications).
-
Restriction notifications - Enable or disable notifications in case any of the restrictions is reached. If it is not checked, then the form is not displayed (same fields as in delivery failure notifications).